Qgis Wms Connection
--- sidebarposition: 3 title: \"Configure a QGIS WMS connection to Quay\" description: \"Create a WMS connection in QGIS and attach your OAuth2 authentication ...
--- sidebar_position: 3 title: "Configure a QGIS WMS connection to Quay" description: "Create a WMS connection in QGIS and attach your OAuth2 authentication configuration to access Quay-protected maps."
This page shows how to set up a WMS/WMTS connection in QGIS that uses the OAuth2 configuration you created in the previous step.
Prerequisite
- Complete the prior step: Configure QGIS OAuth2 authentication for Quay.
Steps (QGIS UI)
- In QGIS, go to Layer → Data Source Manager → WMS/WMTS, then click New.
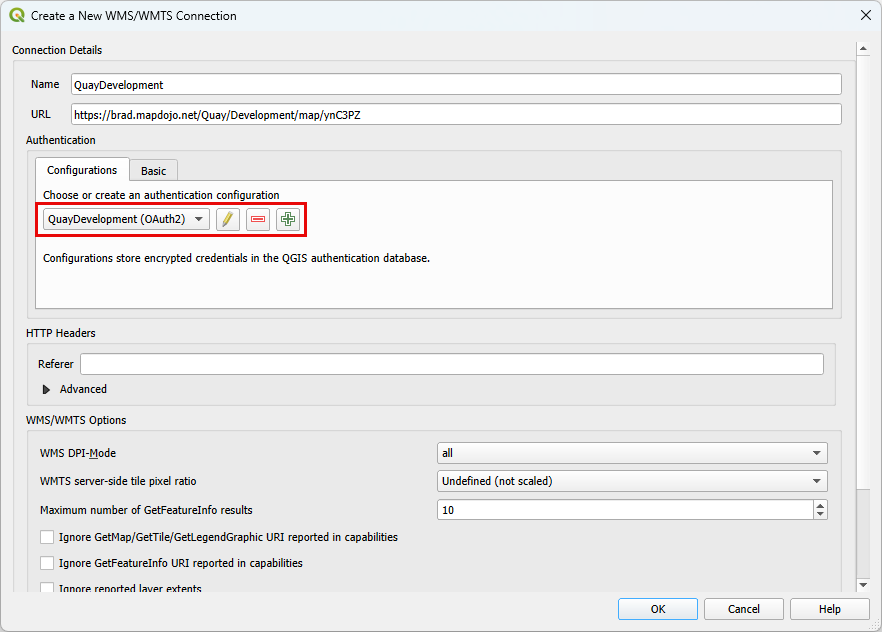
- Enter a Name (example):
QuayDevelopment. - URL: enter your Quay WMS endpoint. Example:
https://<your-server>/Quay/Development/map/<mapId>- Example shown in screenshot:
https://brad.mapdojo.net/Quay/Development/map/vnC3PZ
- Under Authentication → Configurations, choose your OAuth2 configuration (example:
QuayDevelopment (OAuth2)). - Click OK to save the connection, then select it and click Connect to list available layers. Add layers as needed.
Screenshot (example)
Notes
- If your OAuth2 configuration does not appear, ensure you saved it in the previous step and restart QGIS if needed.
- If your browser opens for sign-in, complete authentication and return to QGIS. Tokens are stored in QGIS’s authentication database.
- If you receive 401/403 errors, verify the WMS URL is correct and that you can reach the Quay site from your machine. Also ensure prerequisites (IIS features and hosting bundle) are installed on the server.
Related
- Configure QGIS OAuth2 authentication for Quay
- Installation prerequisites → IIS Features
- Installation prerequisites → HTTP Error 500.19 – Install the ASP.NET Core Hosting Bundle